Don’t hesitate to contact us:
Forum: discuss.graphhopper.com
Email: support@graphhopper.com
With the GraphHopper Directions API it is easy to calculate the route from A to B including multiple intermediate waypoints. Our customers often use the Route Optimization API to get an optimized order of many deliveries. To deliver your packages or services in real world you additionally need a navigation application where you need turn instructions and so called path details like the speed limit from the Routing API.
Fetching the coordinates is easy, just specify points_encoded=false and the path.points entry is like GeoJSON:
{ "type": "LineString",
  "coordinates":
   [[longitude1, latitude1, elevation1],
    [longitude2, latitude2, elevation2],
     …
   ]
}
This format is not compact as there can be hundred of coordinates and to reduce bandwidth the default is a so called “encoded polyline” (points_encoded=true) and the path.points entry is a string that needs a special decoding procedure which is automatically done in our implementations for the JavaScript and Java client. So, if you use one of these clients you do not need to worry about this and just use the coordinates array in path.points.
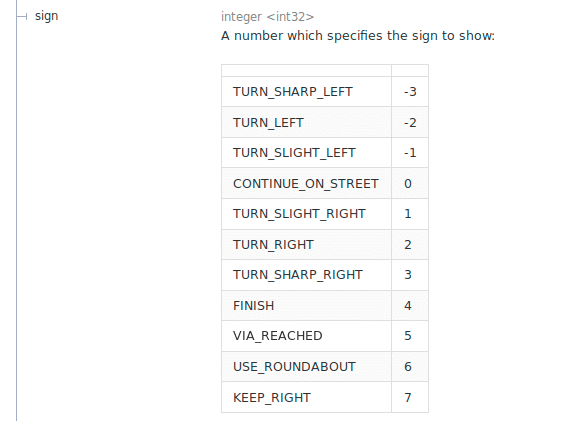
To split the entire points array into “coordinates per leg” you follow the same procedure as described above with the distance and create a new array whenever the instruction.sign is 5 (VIA_REACHED).
Let’s imagine you build a navigation app and you need to show a speed limit warning or build a bicycle route planning app and want to display road segments with problematic surfaces like “sand” or “cobblestone”.
With the Routing API this is easy and the response stills stays reasonable small as the coordinates are transmitted only once in the points array. Then you use the indices into the path.points array to get the coordinates of the path details. Let us explain this step by step.
To get the speed limit or surface data for the entire path you specify details=max_speed or details=surfaceor both in the request. See our documentation for more options like street_name or road_class. To find the actual values like “50 km/h” or “sand” from the response you need to do the following:
json.paths from the Routing API => pick the first pathpath.details.max_speed[[0,2,50], [5,7,80]]The first array is [0,2,50] and means from index 0 to 2 of the points the speed limit is 50 km/h and the second array is [2,7,80] and means 80 km/h. Let us assume the following path.points array (in format latitude,longitude,elevation):
[10.524421,51.876565,493.56],
[10.524475,51.876701,484.82],
[10.525098,51.87756,478.27],
[10.525237,51.877674,474.2],
[10.525846,51.877848,471.56],
[10.526792,51.877985,470.06],
[10.527895,51.878086,466.6],
[10.528765,51.878223,458.68]
Then the first speed limit 50 km/h is valid for the 3 coordinates 0 to 2:
[10.524421,51.876565,493.56],
[10.524475,51.876701,484.82],
[10.525098,51.87756,478.27],
and the 80 km/h is valid for the 6 coordinates 2 to 7:
[10.525098,51.87756,478.27],
[10.525237,51.877674,474.2],
[10.525846,51.877848,471.56],
[10.526792,51.877985,470.06],
[10.527895,51.878086,466.6],
[10.528765,51.878223,458.68]
Please note that the coordinate at index 2 (the black line) is part of both lists, i.e. where the first path detail ends, the second path detail begins and so forth. Also every value can be ‘null’ for road segments without any known value. There are also special cases like German Autobahn without speed limits where we currently return ‘150’ because the maximum explicit speed limit for roads in Germany seems to be ‘140’.
Note: since March 2023 there is a simpler method via using the path details leg_distance and leg_time.
One use case is to calculate some details until the next waypoint. This is usually defined as “one leg” and the next leg is until the next waypoint. You can find out e.g. the distance for one leg via:
json.paths from the Routing API => pick e.g. the first pathdistance and set it to 0path.instructions and add the distance until the sign is 5 (waypoint) or 4 (finish)The JavaScript example code looks like:
var distance = 0;
for (instruction of path.instructions) {
  if(instruction.sign == 5 || instruction.sign == 4) {
    console.log("leg distance: " + distance);
    distance = 0;
  } else {
    distance += instruction.distance;
  }
}