Don’t hesitate to contact us:
Forum: discuss.graphhopper.com
Email: support@graphhopper.com
Today you’ll learn how to install our recently released GraphHopper Routing Engine 0.11 with JDK 11 that was released today.
wget http://download.geofabrik.de/europe/germany/berlin-latest.osm.pbfDownload JDK 11
wget https://raw.githubusercontent.com/sormuras/bach/master/install-jdk.sh # use a custom JDK with: ./install-jdk.sh -u "https://..." JAVA_HOME=~/jdk11; bash ./install-jdk.sh -f 11 --target $JAVA_HOME; PATH=$JAVA_HOME/bin:$PATHDownload and start the routing engine with JDK 11
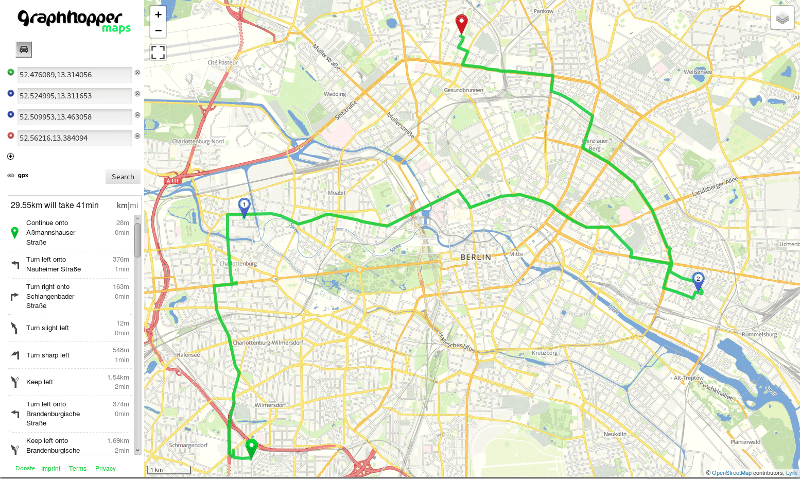
wget https://graphhopper.com/public/releases/graphhopper-web-0.11.0.jar wget https://raw.githubusercontent.com/graphhopper/graphhopper/0.11/config-example.yml java -Xms1g -Xmx1g -Dgraphhopper.datareader.file=berlin-latest.osm.pbf -Dgraphhopper.graph.location=graph-cache -Dgraphhopper.graph.flag_encoders=car -jar graphhopper-web-0.11.0.jar server config-example.ymlAfter a few seconds you should see “Started application@..localhost:8989” then go to localhost:8989 with your browser. Now you can add locations via right click or address search on the left:
This is our GraphHopper Maps demo application and it uses the web service at localhost:8989/route, which is documented here. You can see that not only A-to-B routing is supported but also isochrone requests at localhost:8989/isochrone, calculating the reachable area from one location. The tiles are fetched from an external service as well as the geocoding is done by Nominatim, not GraphHopper.
For production usage tiles can be bought from Thunderforest, Omniscale or MapTiler Cloud and Geocoding could be done using the GraphHopper Geocoding API that also supports autocompletion.
You can find an always up-to-date installation documentation in the Readme.
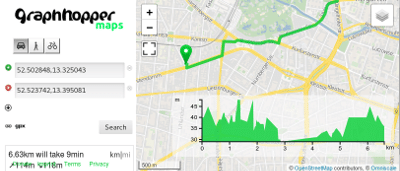
To import not only car but e.g. car, bike and walking you remove the graph-cache (rm -rf graph-cache) and restart the engine with a slightly different flag_encoders parameter. Additionally we enable elevation:
java -Xms1g -Xmx1g -Dgraphhopper.datareader.file=berlin-latest.osm.pbf -Dgraphhopper.graph.location=graph-cache -Dgraphhopper.graph.flag_encoders=car,bike,foot -Dgraphhopper.graph.elevation.provider=srtm -jar graphhopper-web-0.11.0.jar server config-example.ymlBe patient. This will take slightly longer to start as for every profile we precalculate helper files to make routing fast even on a continental scale. After you refreshed the browser you’ll see an elevation window in the bottom right corner and different vehicle profiles in the top left.
To make this work with a world wide coverage you download the necessary planet file from OpenStreetMap and walk through this deployment guide.
[code lang=bash]
$ wget xy
# test
[/code]